Build your own keyboard-pad and Dior's 3d-printer files
6 years 7 months ago - 8 months 3 weeks ago #142142
by gatifun
Build your own keyboard-pad and Dior's 3d-printer files was created by gatifun
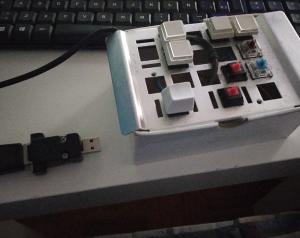
Mine & Others keypad pictures
Ingredients:
Structure: some like these:
www.amazon.com/-/es/Switch-Tester-Keyboa...ptores/dp/B07JNN3JB2
es.aliexpress.com/item/32992516941.html?...02_,searchweb201603_
Brown switches and keycaps (you can test another colors too): es.aliexpress.com/item/32682571027.html
Adapter : stepstick.pl/?35,en_usbjoy20-adapter-con...-your-own-usb-device
Cable with this kind of cable, you can play on amiga machine or pc with the adapter: www.amazon.es/dp/B01MXYZ8QO/ref=pe_3310721_189395781_TE_dp_1
Other options:
| TTC Speed Silver V2 DIY teclado mecánico personalizado para jugadores interruptor lineal 45gf 3 pines RGB SMD interruptores de intercambio en caliente prevención de contatos
a.aliexpress.com/_ExV3JQO
| 40 / 120 Uds 40PIN 20CM línea Dupont macho a macho + hembra y hembra a hembra Cable Dupont para Arduino KIT DIY IBUW
a.aliexpress.com/_EGhyYQS
Cable de extensión de controlador megadrive genesis amiga atari commodore para sega, gran oferta
a.aliexpress.com/_EIB4CB4
Recipe:
- Mount your prefer disposal structure, with switches and capkeys.
- Cut cable (female side) and join the cables :
Ground cable will have to join all the switches, and we have to find which color is ground. (thanks Djowger!)
For me the colors that worked were:
--- blue for every switch (they have 2 pins, then join blue cable to one of every switch)
- and join on the other pin of each switch:
- - green for shoot
- - red for up
- - black for down
- - orange for right
- - grey for left
maybe if works for everyone or maybe you have to try and test it.
- make a knot on the cable just before exits the box, to stop it and don't break it later
- Put adaptor and weld/solder them after testing.
Enjoy
===========================================================
Thanks to Dior, he prepared some files for 3d printer your key keypad case!!! I add them in one zip
Last edit: 8 months 3 weeks ago by gatifun.
Please Log in or Create an account to join the conversation.
- ruicosta10fc
-

- Offline
- Administrator
-

Less
More
- Posts: 156
- Thank you received: 2
6 years 7 months ago #142144
by ruicosta10fc
Replied by ruicosta10fc on topic Build your own keyboard-pad
good stuff gati ") top
top
top
The following user(s) said Thank You: gatifun
Please Log in or Create an account to join the conversation.
6 years 7 months ago - 6 years 7 months ago #142146
by djowGer
Replied by djowGer on topic Build your own keyboard-pad
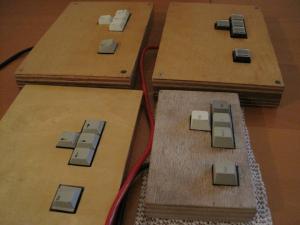
Nice info Gatifun. Just a small correction. The colors varies a lot from cable to cable, so blue is not always ground. From my experience it was mostly black but could be any of the colors. Below is an example of the soldering needed to make it work.

In my example you can see that black/red is soldered to every key, orange is fire button, white is up, blue down, and green and brown are sides.
In my example you can see that black/red is soldered to every key, orange is fire button, white is up, blue down, and green and brown are sides.
Last edit: 6 years 7 months ago by djowGer.
The following user(s) said Thank You: gatifun
Please Log in or Create an account to join the conversation.
6 years 7 months ago - 6 years 7 months ago #142151
by gatifun
Yeah, great info. I edit my first post
Exactly, it must be a previous try to find the right colors. Ground cable will have to join all the switches, and we have to find which color is ground. Good to know Djowger
I specially wanted to share too that you can solder the cables direct to the switch pins too, for me it was easier to understand the procedure.

Replied by gatifun on topic Build your own keyboard-pad
Nice info Gatifun. Just a small correction. The colors varies a lot from cable to cable, so blue is not always ground. From my experience it was mostly black but could be any of the colors. Below is an example of the soldering needed to make it work.
In my example you can see that black/red is soldered to every key, orange is fire button, white is up, blue down, and green and brown are sides.
Yeah, great info. I edit my first post
Exactly, it must be a previous try to find the right colors. Ground cable will have to join all the switches, and we have to find which color is ground. Good to know Djowger
I specially wanted to share too that you can solder the cables direct to the switch pins too, for me it was easier to understand the procedure.
Attachments:
Last edit: 6 years 7 months ago by gatifun.
Please Log in or Create an account to join the conversation.
3 years 11 months ago - 3 years 11 months ago #146106
by batis
Replied by batis on topic Build your own keyboard-pad
What kind of board can we use it for connecting the wires? I don't have knowledge on that part.
Last edit: 3 years 11 months ago by batis.
Please Log in or Create an account to join the conversation.
3 years 11 months ago #146107
by gatifun
Replied by gatifun on topic Build your own keyboard-pad
Hi Bais, In my keypad, I solded directly the cables to the switch legs
Please Log in or Create an account to join the conversation.
3 years 11 months ago #146108
by batis
Replied by batis on topic Build your own keyboard-pad
You are cutting RB9 cable and connecting its wires to keys, right?
Please Log in or Create an account to join the conversation.
3 years 11 months ago #146109
by gatifun
Replied by gatifun on topic Build your own keyboard-pad
Yep, I cut it, but I think there also are with only one db9 in one extreme and the wire on the other on internet stores.
It is very important to check the right colors for each switch, because not always the colors are the same in every cable.
It is very important to check the right colors for each switch, because not always the colors are the same in every cable.
The following user(s) said Thank You: batis
Please Log in or Create an account to join the conversation.
3 years 11 months ago #146110
by thd79
Replied by thd79 on topic Build your own keyboard-pad
Another way to do this is to use a DB9 Breakout board like this:
cpc.farnell.com/clever-little-box/clb-ds...fo1ZE7xoCnkwQAvD_BwE
which has screw terminals for wire connections. Then use a male-male cable to connect to the computer.
cpc.farnell.com/clever-little-box/clb-ds...fo1ZE7xoCnkwQAvD_BwE
which has screw terminals for wire connections. Then use a male-male cable to connect to the computer.
Please Log in or Create an account to join the conversation.
3 years 11 months ago - 3 years 11 months ago #146111
by gatifun
Replied by gatifun on topic Build your own keyboard-pad
I'd prefer not to tell you it is good because I don't know, It seems so,
but, the screws on the sides, maybe don't allow to put it on the conectors. btw, my mist has the same screws but in the machine, female. and it says DE, if you put DB option, the gadget change. I don'tknow
I think you have to ask djowger and playavely in discord, I think they know everything about amigas, I have not got that experience.
Last edit: 3 years 11 months ago by gatifun.
Please Log in or Create an account to join the conversation.
Time to create page: 2.437 seconds